

Getting Started with Nestjs REST & Graphql API
School Portal Backend with Typescript Backend API


Nestjs, my favourite backend framework, according to the website is described as,
Nestjs is a framework for building efficient, scalable Node.js server-side applications. It uses progressive JavaScript, is built with and fully supports TypeScript (yet still enables developers to code in pure JavaScript) and combines elements of OOP (Object Oriented Programming), FP (Functional Programming), and FRP (Functional Reactive Programming).
Nestjs is to the backend what Angular is to the frontend. To get started, scaffold the project with the Nest CLI: nest new [project-name] e.g.
    $ npm i -g @nestjs/cli
    $ nest new portal
To watch for changes in your files, automatically recompiling and reloading the server, you can run the following command to start the application:
$ npm run start:dev
This command starts the app with the HTTP server listening on the port defined in the src/main.ts file. Once the application is running, open your browser and navigate to http://localhost:3000/. You should see the Hello World! message.
Open your browser and navigate to http://localhost:3000/
The portal directory will be created, node_modules and a few other boilerplate files will be installed, and an src/ directory will be created and populated with several core files.
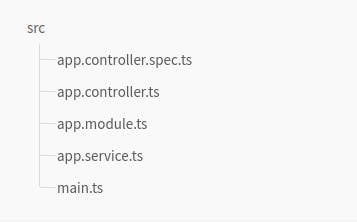
Here's a brief overview of those core files:
| Core Files | Description |
| app.controller.ts | A basic controller with a single route. |
| app.controller.spec.ts | The unit tests for the controller. |
| app.module.ts | The root module of the application. |
| app.service.ts | A basic service with a single method. |
| main.ts | The entry file of the application which uses the core function NestFactory to create a Nest application instance. |
For quickly creating a CRUD controller with the validation built-in, you may use the CLI's CRUD generator: nest g resource [name]
nest g resource department
Controllers
Controllers are responsible for handling incoming requests and returning responses to the client. The routing mechanism controls which controller receives which requests. Frequently, each controller has more than one route, and different routes can perform different actions.
In order to create a basic controller, we use classes and decorators. Decorators associate classes with required metadata and enable Nest to create a routing map (tie requests to the corresponding controllers).
To create a controller using the CLI, simply execute the $ nest g controller departments command.
departments.controller.ts
import { Controller, Get, Query, Post, Body, Put, Param, Delete } from '@nestjs/common';
import { CreateDepartmentDto, UpdateDepartmentDto, ListAllEntities } from './dto';

@Controller('departments')
export class DepartmentsController {
  @Post()
  create(@Body() createDepartmentDto: CreateDepartmentDto) {
    return 'This action adds a new department';
  }

  @Get('all')
  findAll(@Query() query: ListAllEntities) {
    return `This action returns all departments (limit: ${query.limit} items)`;
  }

  @Get(':id')
  findOne(@Param('id') id: string) {
    return `This action returns a #${id} department`;
  }

  @Put(':id')
  update(@Param('id') id: string, @Body() updateDepartmentDto: UpdateDepartmentDto) {
    return `This action updates a #${id} department`;
  }

  @Delete(':id')
  remove(@Param('id') id: string) {
    return `This action removes a #${id} department`;
  }
}
The route path includes both the optional controller path prefix and any path string declared in the request method decorator. For example, a path prefix of departments combined with the decorator @Get('all') would produce a route mapping for requests like GET /departments/all.
In order to define routes with parameters, we can add route parameter tokens in the path of the route to capture the dynamic value at that position in the request URL. The route parameter token in the @Get() decorator example in findOne demonstrates this usage. Route parameters declared in this way can be accessed using the @Param() decorator, which should be added to the method signature.
Request Payloads
A DTO is an object that defines how the data will be sent over the network. We could determine the DTO schema by using TypeScript interfaces, or by simple classes. Interestingly, we recommend using classes here. Why? Classes are part of the JavaScript ES6 standard, and therefore they are preserved as real entities in the compiled JavaScript. On the other hand, since TypeScript interfaces are removed during the transpilation, Nest can't refer to them at runtime. This is important because features such as Pipes enable additional possibilities when they have access to the metatype of the variable at runtime.
create-departments.dto.ts
export class CreateDepartmentDto {
  name: string;
  faculty: string;
  hod: string;
  fee: number;
  students: string[];
}
app.module.ts
import { Module } from '@nestjs/common';
import { DepartmentsController } from './departments/departments.controller';

@Module({
  controllers: [DepartmentsController],
})
export class AppModule {}
Module
To create a module using the CLI, simply execute the
$ nest g module departmentscommand.
A module is a class annotated with a @Module() decorator which provides metadata that Nest makes use of to organize the application structure.
Each application has at least one module, a root module. The root module is the starting point Nest uses to build the application graph - the internal data structure Nest uses to resolve module and provider relationships and dependencies.
The @Module() decorator takes a single object whose properties describe the module:
providers: the providers that will be instantiated by the Nest injector and that may be shared at least across this modulecontrollers: the set of controllers defined in this module which have to be instantiatedimports: the list of imported modules that export the providers which are required in this moduleexports: the subset of providers that are provided by this module and should be available in other modules which import this module. You can use either the provider itself or just its token (provide value)
With the controller fully defined, Nest still doesn't know that DepartmentsController exists and as a result won't create an instance of this class.
Controllers always belong to a module, which is why we include the controller's array within the @Module() decorator. Since we haven't yet defined any other modules except the root AppModule, we'll use that to introduce the DepartmentsController: app.module.ts
import { Module } from '@nestjs/common';
import { DepartmentsController } from './departments/departments.controller';

@Module({
  controllers: [DepartmentsController],
})
export class AppModule {}
If you generated a module for the department departments.module.ts, use it instead of using the App Module, app.module.ts.
departments/departments.module.ts
import { Module } from '@nestjs/common';
import { DepartmentsController } from './departments.controller';
import { DepartmentsService } from './departments.service';

@Module({
  controllers: [DepartmentsController],
  providers: [DepartmentsService],
})
export class DepartmentsModule {}
Services
To create a service using the CLI, simply execute the
$ nest g service departmentscommand.
Let's start by creating a simple DepartmentsService. This service will be responsible for data storage and retrieval. And it is designed to be used by the DepartmentsController, so it's a good candidate to be defined as a provider.
departments.service.ts
import { Injectable } from '@nestjs/common';
import { Department } from './interfaces/department.interface';

@Injectable()
export class DepartmentsService {
  private readonly departments: Department[] = [];

  create(department: Department) {
    this.departments.push(department);
  }

  findAll(): Department[] {
    return this.departments;
  }
}
interfaces/department.interface.ts
export interface Department {
  name: string;
  faculty: string;
  hod: string;
  fee: number;
  students: string[];
}
Now that we have a service class to retrieve departments, let's use it inside the DepartmentsController: departments.controller.ts
import { Controller, Get, Post, Body } from '@nestjs/common';
import { CreateDepartmentDto } from './dto/create-department.dto';
import { DepartmentsService } from './departments.service';
import { Department } from './interfaces/department.interface';

@Controller('departments')
export class DepartmentsController {
  constructor(private departmentsService: DepartmentsService) {}

  @Post()
  async create(@Body() createDepartmentDto: CreateDepartmentDto) {
    this.departmentsService.create(createDepartmentDto);
  }

  @Get()
  async findAll(): Promise<Department[]> {
    return this.departmentsService.findAll();
  }
}
Provider registration
Now that we have defined a provider (DepartmentsService), and we have a consumer of that service (DepartmentsController), we need to register the service with Nest so that it can perform the injection. We do this by editing our module file (app.module.ts) and adding the service to the providers array of the @Module() decorator. app.module.ts JS
import { Module } from '@nestjs/common';
import { DepartmentsController } from './departments/departments.controller';
import { DepartmentsService } from './departments/departments.service';

@Module({
  controllers: [DepartmentsController],
  providers: [DepartmentsService],
})
export class AppModule {}
Nest will now be able to resolve the dependencies of the DepartmentsController class.